

Description
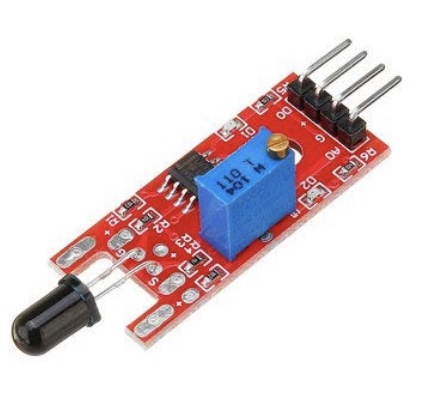
The KY-026 Flame Sensor module lets you detect fire, flames, and other infrared heat sources with an Arduino. Also sold as a fire sensor or flame detector — and printed HW-491 on some clones — this 4-pin board uses an infrared phototransistor tuned to the 760–1100 nm wavelengths a flame emits. It’s a staple of 37-in-1 and starter sensor kits.
The module gives you two outputs: a digital output (D0) that switches when the infrared level crosses a threshold you set with the on-board potentiometer (through an LM393 comparator), and an analog output (A0) that reports the raw infrared intensity (0–1023 on a 10-bit Arduino ADC, 0–4095 on a 12-bit ESP32). It runs on 3.3 V or 5 V and works with Arduino and ESP32.
KY-026 SPECIFICATIONS
This module consists of a YG1006 5 mm infrared phototransistor — a fast, sensitive NPN silicon photo-sensor — an LM393 dual differential comparator, a 3296W trimmer potentiometer, 6 resistors, 2 indicator LEDs (power and digital-output), and 4 male header pins. Also sold as a fire sensor or flame detector, the board provides both an analog output (raw infrared intensity) and a digital output (adjustable threshold).
| Operating Voltage | 3.3 V ~ 5.5 V |
| Sensor Element | YG1006 NPN IR phototransistor (5 mm) |
| Infrared Wavelength Detection | 760 nm ~ 1100 nm |
| Detection Angle | ~60° |
| Detection Range | ~60–100 cm (varies with flame size) |
| Comparator | LM393 dual differential |
| Sensitivity Adjustment | 3296W trimmer potentiometer |
| Pins | 4 — G, +, D0, A0 |
| Outputs | Digital (D0) + Analog (A0) |
| Board Dimensions | 36 × 15 × 14 mm [1.4 × 0.6 in] |
| Weight | ~2 g |
HOW THE KY-026 WORKS
A flame emits a broad band of infrared light, strongest between roughly 760 and 1100 nm. The KY-026’s YG1006 phototransistor is most sensitive in exactly that range: when infrared lands on it, it conducts harder, shifting the voltage across the on-board resistor divider. The more infrared it sees — a closer or larger flame — the bigger that voltage swing.
That raw voltage is used two ways. The analog output (A0) passes it straight through, so A0 reports the live infrared intensity — handy when you want to gauge how strong or how near a flame is. The same signal also feeds one half of the LM393 comparator, which weighs it against a reference voltage you set with the 3296W trimmer; once the infrared crosses that threshold the comparator flips the digital output (D0) and lights the on-board D0 LED. So D0 is a simple flame / no-flame switch, while A0 is the continuous reading.
Because the module reacts to infrared rather than to “fire” itself, anything that emits in the same 760–1100 nm band can set it off — sunlight, incandescent and halogen bulbs, and radiant heaters included. That’s why placement and threshold tuning matter, and why the analog reading (plus a flame’s characteristic 1–20 Hz flicker) helps tell a real flame from steady background IR.
KY-026 PINOUT
| Pin | Function |
|---|---|
| G (GND) | Ground / 0 V |
| + (VCC) | Power input, 3.3 V – 5 V |
| D0 | Digital output — goes LOW when a flame is detected (active-LOW on most boards); threshold set by the on-board trimmer |
| A0 | Analog output — raw infrared intensity; the reading drops as the flame/IR level rises |
Pin labels and order vary slightly between clones — check the silkscreen. The KY-026 is also sold as the HW-491. The on-board D0 LED mirrors the digital output, so watch it to confirm your board’s polarity: on most boards D0 (and the LED) reads HIGH at rest and drops LOW when a flame is detected.
CONNECTION DIAGRAM
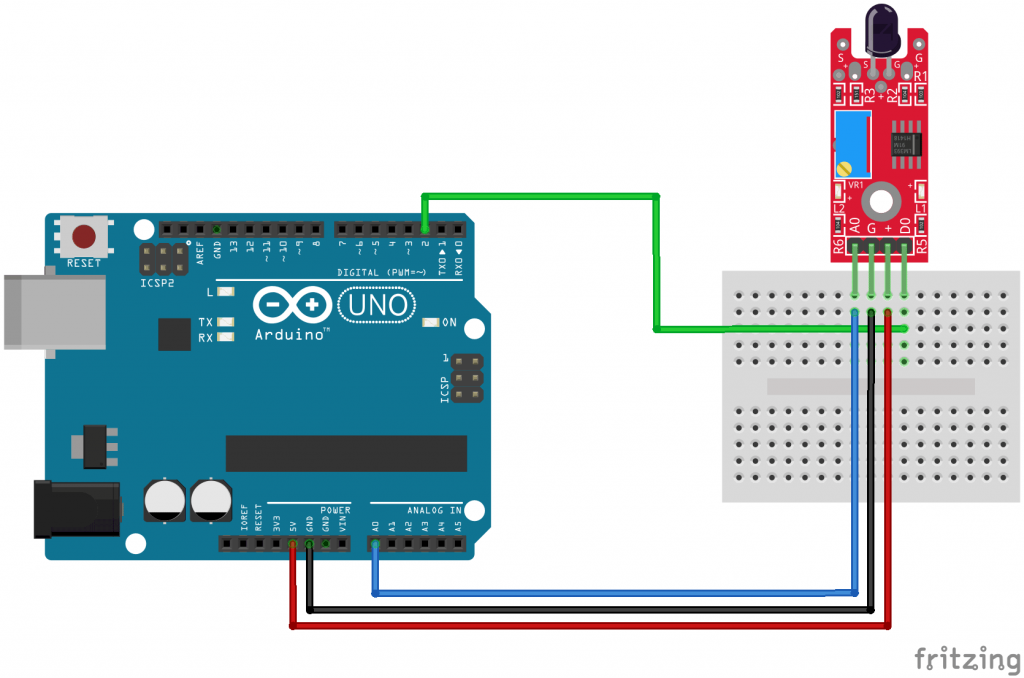
Connect the board’s analog output (A0) to pin A0 on the Arduino and the digital output (D0) to pin 3.
Connect the power line (+) and ground (G) to 5V and GND respectively.
| KY-026 | Arduino |
|---|---|
| A0 | Pin A0 |
| G | GND |
| + | +5V |
| D0 | Pin 2 |
KY-026 ARDUINO CODE
In this Arduino sketch we’ll read values from both digital and analog interfaces on the KY-026, use a lighter or a candle to interact with the flame detector module.
On most boards the digital output (D0) is active-LOW — it goes LOW when a flame is detected, and the sketch uses that to light the LED on pin 13. Turn the potentiometer clockwise to raise sensitivity and counter-clockwise to lower it. If your board’s LED logic is reversed, change FLAME_STATE to HIGH.
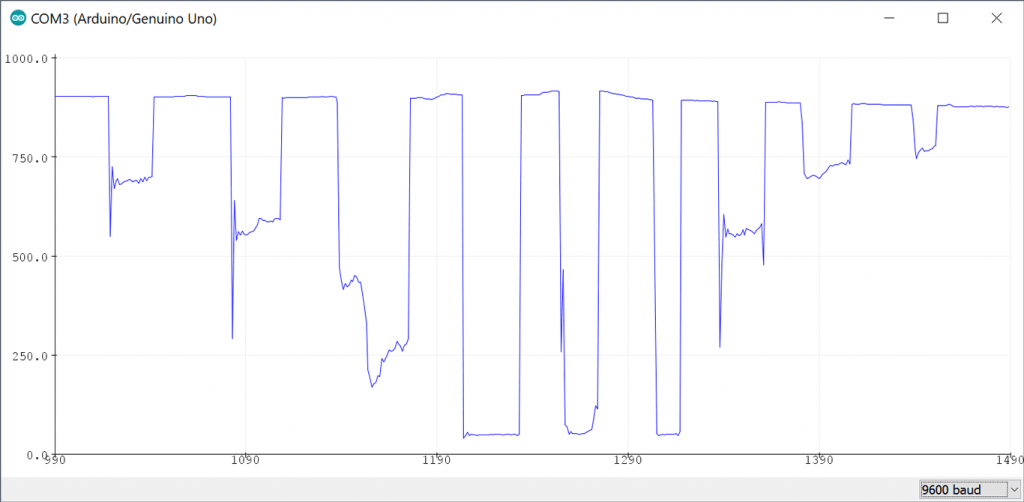
The analog output (A0) returns a high value when no flame is near and drops toward zero as a flame approaches.
const int ledPin     = 13;  // on-board Arduino LED
const int digitalPin = 2;   // KY-026 D0
const int analogPin  = A0;  // KY-026 A0

const int FLAME_STATE = LOW; // D0 level when a flame is present (LOW on most boards)

const unsigned long DEBOUNCE_MS = 50; // ignore D0 flicker shorter than this
int lastReading        = HIGH;
int flameState         = HIGH;
unsigned long lastEdge = 0;

void setup() {
  pinMode(ledPin, OUTPUT);
  pinMode(digitalPin, INPUT);
  Serial.begin(9600);
}

void loop() {
  // --- Digital output (D0): debounced flame / no-flame switch ---
  int reading = digitalRead(digitalPin);
  if (reading != lastReading) {
    lastEdge = millis();        // input changed: restart the debounce timer
    lastReading = reading;
  }
  if (millis() - lastEdge > DEBOUNCE_MS) {
    flameState = reading;       // stable long enough: accept the new level
  }

  bool flame = (flameState == FLAME_STATE);
  digitalWrite(ledPin, flame ? HIGH : LOW);

  // --- Analog output (A0): raw infrared intensity ---
  // Higher reading = less infrared; the value drops as a flame gets closer.
  int analogVal = analogRead(analogPin);
  Serial.println(analogVal);    // Tools > Serial Plotter to graph it

  delay(100);
}
Use Tools > Serial Plotter on the Arduino IDE to visualize the values on the analog interface, in this example we used a lighter to create a small flame every couple of seconds. You can see the values decreasing as the flame gets closer to the sensor and then increasing when the flame moves away from the sensor.
KY-026 ESP32 CODE — FIRE ALARM
The KY-026 pairs nicely with an ESP32 to build a small standalone fire alarm. This sketch reads the digital output to trigger, reports the analog intensity over serial, and drives an active buzzer(or a relay) plus the on-board LED whenever a flame appears. Because the ESP32 ADC is 12-bit, analogRead() returns 0–4095 rather than the Arduino’s 0–1023.
const int ledPin     = 2;    // on-board LED on many ESP32 dev boards
const int digitalPin = 4;    // KY-026 D0 -> any digital GPIO
const int analogPin  = 34;   // KY-026 A0 -> an ADC1 GPIO (GPIO34 is input-only)
const int buzzerPin  = 5;    // active buzzer (+) or relay IN

const int FLAME_STATE = LOW; // D0 level when a flame is present (LOW on most boards)

void setup() {
  pinMode(ledPin, OUTPUT);
  pinMode(buzzerPin, OUTPUT);
  pinMode(digitalPin, INPUT);
  digitalWrite(buzzerPin, LOW);
  Serial.begin(115200);
}

void loop() {
  bool flame = (digitalRead(digitalPin) == FLAME_STATE);
  int intensity = analogRead(analogPin); // 0-4095 on the 12-bit ESP32 ADC

  if (flame) {
    digitalWrite(buzzerPin, HIGH);       // sound the alarm
    digitalWrite(ledPin, HIGH);
    Serial.print("FLAME DETECTED! intensity = ");
    Serial.println(intensity);
  } else {
    digitalWrite(buzzerPin, LOW);        // all clear
    digitalWrite(ledPin, LOW);
  }

  delay(100);
}
The same sketch runs on an Arduino UNO — just use pin 2 for D0, A0 for the analog pin, and Serial.begin(9600). On most boards D0 is active-LOW (LOW = flame); if yours is inverted, set FLAME_STATE to HIGH.
KY-026 APPLICATIONS
Because it reacts quickly to the infrared signature of an open flame, the KY-026 is a popular fire detector for hobby safety and automation projects. Common uses include:
- Fire and flame alarms — sound a buzzer or trip a relay the moment a flame appears.
- Home and kitchen safety monitors — early warning around stoves, candles, and fireplaces.
- Fire-fighting robots — steer a robot toward a flame to extinguish it.
- Robot and drone fire avoidance — keep autonomous machines clear of open flames.
- Industrial furnace and boiler flame monitoring — confirm a pilot flame stays lit.
- Campfire, BBQ, and workshop monitoring — alert if a fire flares up or dies down.
TROUBLESHOOTING & FAQ
Short range or no detection
The KY-026 detects a small flame only up to about 60–100 cm, and the range scales with flame size. If detection is unreliable, move the sensor closer, test with a larger flame, and turn the trimmer counter-clockwise to raise sensitivity.
D0 is always on (or always off)
The digital output is a simple threshold set by the on-board trimmer. If D0 never changes state, adjust the trimmer until the D0 LED toggles as you introduce and remove a flame. Remember that D0 is active-LOW on most boards (LOW = flame).
Analog readings look backwards
On this board the analog value is highest with no flame and drops as infrared rises, so a closer flame produces a lower number. This is normal — compare readings against the resting value instead of assuming a higher number means more flame.
How does the KY-026 detect fire?
A YG1006 infrared phototransistor responds to the radiation a flame emits, strongest between 760 and 1100 nm. An LM393 comparator converts that into a clean digital signal at a threshold you set with the trimmer, while the analog output reports the raw infrared intensity.
What’s the difference between the D0 and A0 outputs?
D0 is a digital flame / no-flame switch that flips at the threshold you set. A0 is a continuous analog reading of infrared intensity. Use D0 for simple alarms and A0 when you want to gauge how strong or how near a flame is.
Is the KY-026 D0 output active-HIGH or active-LOW?
On most boards D0 is active-LOW: it reads HIGH at rest and drops LOW when a flame is detected. Clones vary, so watch the on-board D0 LED to confirm your board, and flip FLAME_STATEin the code if yours is reversed.
What is the detection range of the KY-026?
Roughly 60–100 cm for a small flame, increasing with flame size. The KY-026 is designed for close-range flame detection rather than long-distance sensing.
Why does the KY-026 false-trigger in sunlight, and how do I stop it?
Sunlight and incandescent or halogen lamps emit in the same 760–1100 nm band as a flame, so they can trigger the sensor. Shield it from direct light, point it away from windows and lamps, raise the threshold with the trimmer, and for extra certainty detect the flame’s characteristic 1–20 Hz flicker in software.
How do I adjust the KY-026 sensitivity?
Turn the on-board 3296W trimmer potentiometer: clockwise raises sensitivity (triggers on weaker or more distant flames) and counter-clockwise lowers it. Tune it until the D0 LED switches reliably for your flame size and distance.
Can I use the KY-026 with an ESP32 or Raspberry Pi?
Yes. The module runs on 3.3 V or 5 V. On an ESP32, use the fire-alarm sketch above (its ADC is 12-bit, so analogRead() returns 0–4095). On a Raspberry Pi, read D0 on any GPIO; the A0 analog output needs an external ADC such as an MCP3008 because the Pi has no analog input.
Is the HW-491 the same as the KY-026?
Yes. HW-491 is a common silkscreen label for the same flame-sensor board. The pinout, wiring, and code are identical to the KY-026.
Can I simulate the KY-026 in Wokwi?
Wokwi is a free online simulator for Arduino and ESP32 projects. It has no dedicated KY-026 part, but you can emulate the sensor with a generic analog/digital input or a potentiometer to mimic the A0 and D0 signals while you develop your code.
Packing List:
1 x KY-026 Flame Sensor


